Showing posts with label sides. Show all posts

Monday, February 11, 2013

Cheese Crackers

We are a cracker family.  I would say we can go through at least 7 sleeves of saltines a week - hey it is something the Stinks will eat so we don't argue too much!  Cheez-its are always a good "fall back" food when you want something salty yet not too grease.

When I came across a recipe for goldfish crackers I decided to try my hand at adapting it to taste like cheez-its.  Now I am posting this recipe after only making it once, so you will have to excuse the "I think I will do this/that next time" comments.  They were just so yummy out of the oven that I had to share before I recreated!

Cheese Crackers

  • 1 c Flour
  • 4 T Butter or Margarine
  • 8 oz Cheddar Cheese, shredded*
  • 2 - 2 1/2 T Water, cold
  • 1-2 t Salt
  1. If you are using a cheese block, be sure to shred the cheese.  Combine cheese, flour, and butter in your food processor and pulse until mixed.  
  2. Add the water 1 tablespoon at a time until a dough consistency can be formed.  Knead the dough on the counter a few times to bring it together.
  3. Wrap the dough in plastic wrap and refrigerate for at least 30 minutes.  
  4. Preheat your oven to 350 F and lined cookie sheets with parchment paper.
  5. Roll out the dough into a THIN sheet.  Cut out the cracker shapes you desire and place them on the paper-lined sheets.  Repeat this process until all the dough it used.
  6. Sprinkle the salt over the unbaked crackers.  
  7. Bake for 15-20 minutes - the longer you bake them the crispier they are, however be careful not to burn the bottoms.  If you would like to bake longer than 20 minutes I suggest you flip the crackers to keep the bottoms from burning.
  8. ENJOY!

*I used a reduced fat block of cheese that I shredded in the food processor prior to adding the flour and butter.  It worked out VERY well.


I have never had a warm cheez-it before and I have to say these were delicious!  The things I will do differently next time are as follows:

  1. I will roll my dough a lot thinner.  The crackers don't expand, but they puff up quite a bit if the dough is thick.  Which takes away from the crunch.  Next time I will go for paper thin crackers.
  2. I will try adding the salt directly into the dough instead of sprinkling it on top.  I think that will give the dough a nicer all around salty flavor without catching some that are too salty and others that have none.
  3. I will cut out FUN SHAPES!

Seeing everyone will cut out different size and shaped crackers I can't give you a calorie count for yours.  I can say that I rolled out 120 crackers with this recipe.  The total recipe is about 1200 calories - please keep in mind that these are fairly thick!


All in all this is definitely something I will be making again.  I am already picturing all the different types of cheeses I want to try!

Friday, February 8, 2013

Quinoa Doughnuts

Zucchini bites and pizza muffins are always a big hit in this household.  We apparently like little muffin/doughnut shaped food that is easily dip-able.  With that in mind I have been researching other "mini-muffin" foods.  There are broccoli bites - which I haven't perfected yet but they are close, hash brown cakes, rice balls... the list is never ending.
Today I decided to take a stab at quinoa bites.  Seeing I was also making zucchini tots (a current favorite here) I turned the quinoa bites into quinoa doughnuts.  Not sure if I am a fan.  I think I will have to keep tweaking here and there to get the perfect taste. They are a lot like the pizza bites in the sense that you can put whatever you want in them to create the taste you are craving.  Here is how I made them today, the * ingredients are those that create the "base" change around everything else to create your own masterpiece.

Quinoa Doughnuts

  • 2 c Quinoa, cooked*
  • 1 c Carrots, shredded*
  • 2 Eggs*
  • 2 T Flour*
  • 1/4 - 1/2 c Cheese, Shredded (your preference)*
  • Italian Seasoning
  • Parsley
  • Onion, diced
  • 2 cloves of Garlic
  • Season Salt
  1. Preheat the oven to 350 F and grease 2 doughnut pans (or 2 mini muffin tins, 2 regular muffin tins - it is really up to you).
  2. Combine all the ingredients and divide between the tins.
  3. Bake at 350 F for 25 - 30 minutes.  
  4. ENJOY
See they are super simple to make!  I am just not sure I am a fan of the carrot base.  I was going to try zucchini, I will let you know how that works out.

If you give them a try let me know your thoughts!

Wednesday, January 30, 2013

Loaf Bread


I am on a quest to make all of my favorite kinds of bread.  I am almost to the point where I could supply my family with homemade versions of our favorite breads - crescent rolls are the only ones giving me a problem.


I own a bread machine, but hardly ever use it anymore.  I am much more likely to mix, pound, and roll out my own doughs.  It is NOT DIFFICULT people and oh so rewarding when you get those perfect loaves!  Though I am still partial to peasant or crusty bread, we all need a good, standard loaf bread recipe.

Loaf Bread

  • 2 1/2 c Warm Water
  • 1 T Dry Active Yeast
  • 1 T Sugar
  • 7 c Flour
  • 2 t Salt
  • 1/4 c Butter or Margarine, softened
Got to love a perfectly rising
bread dough!
  1. Combine 1/2 c warm water, the sugar and the yeast in your mixing bowl.  Set aside for 5-10 minutes - it should foam.  If it doesn't foam than either your yeast is no good or your water was too hot and killed the yeast.  Try again.  
  2. Once the yeast mixture is nice and foamy add in the remaining 2 c of water and 3 cups of flour.  Mix well, it will be thin!
  3. Finally add in the butter, remaining 4 c of flour and the salt.  (We mix the flour in stages to keep the salt from affecting the yeast mixture.)  
  4. If you are using a mixer with a dough hook, continue mixing the dough for about 5-10 minutes until it is nicely elastic.  If you are mixing by hand you will need to knead the dough on your counter for 10-15 minutes until nicely elastic and uniform.  
  5. Return the dough back to the mixing bowl, no need to oil or wash the bowl, cover the bowl with a towel and place in a warm draft free spot to allow the dough to rise.  (I place my bowl in the microwave as I am normally using my oven while I am waiting for the dough to rise.)
  6. Grease two loaf pans and set them aside.
  7. After the dough has doubled in size (about 2 hours) punch it down and divide the dough in half. Flatten each half to about the size of a piece of paper and fold them in on themselves like you would a letter.  Pinch the seams and place in the prepared loaf pans.  Be sure to push the dough down so it touches all the sides of the pan. Return the loaf pans to your warm, draft free, and dry space (not the oven), cover them with the towel and allow the dough to rise once more.  It should take about an hour to double in size.
  8. Preheat your oven to 375 F.  
  9. Once the dough has doubled in size again place in the oven and bake for 30-40 minutes.  The crust will turn a nice golden brown.
  10. Immediately remove the loaves from the pans when taking them out of the oven and set on a rack to cool.
  11. ENJOY!
I know it is a lot of steps but it is really simple!  I would give you the calorie count of a slice, but everyone prefers a different thickness to their bread.  I will tell you that the recipe makes 2 loaves with a total calorie count of 3360 - divide as you will!  I am not one to each many sandwiches (PB&J is pretty much it) but I do enjoy toast!  This bread makes some EXCELLENT toast.  I am also thinking it will make great french toast!  As soon as I kick this flu, I will be trying that out.


Here are some links to the many other breads I have tackled lately:

Wednesday, January 9, 2013

Pizza Crescents

Brian's "Work from Home" lunch!
If you have perused all my recipes on here you have probably noticed a reoccurring theme:  pizza.  We like pizza in this house.  We are willing to try any incarnation if the title says "Pizza" and thus pizza crescents were born.

Today I was looking for something to make for lunch.  Brian was working from home and I figured a nice hot lunch is just what we could use.  Looking in the fridge made me drag my feet in making anything super involved.  I was originally thinking pizza muffins but they can be oily at times and I wasn't in the mood for all that pepperoni.  I then contemplated zucchini bites, but I wanted Brian to be happy about lunch so that was vetoed at well.  Finally I settled on something "new".  This is probably the easiest and least thought inducing menu item I have ever made.

Pizza Crescents

  • 1 can Reduced Fat Crescent Rolls
  • 16 slices of Pepperoni
  • 4 Light String Cheese Sticks
  • Italian Seasoning
  • Parmesan Cheese for sprinkling
  1. Preheat oven to 375 F.
  2. Unroll the crescent rolls and place 2 pepperoni slices and half a string cheese on each wedge. 
  3. Roll the crescent rolls up like you normally would.  Be sure to pinch all the edges closed to keep the cheese from melting out.
  4. Place the crescents on your baking dish.  Sprinkle them with italian seasoning and freshly grated parmesan cheese.
  5. Bake until the crescents are golden brown.
  6. Serve with pizza dipping sauce and veggies.  ENJOY!
Isn't that the simplest thing you have ever read?  They took NO TIME to make and were pretty yummy.  The only issue with these is that they aren't exactly calorie friendly if you have a BIG appetite.  I was content with eating 2 rolls and a bunch of cucumbers but if 2 rolls isn't going to do it for you then the calories count could add up!  Seeing there are eight crescent rolls in a pack, I decided that 2 rolls would be a serving size.  The pizza crescents come in at about 265 calories per serving (see what I mean about big appetites having a higher calorie count?!)  I can honestly say that my 2 rolls filled me up plenty though and they weren't oily or overly pepperoni flavored like the pizza muffins can be.

Friday, January 4, 2013

Pita Bread

Don't mind the Penguin Mug Collection in
the background!
I am starting to think that I need a section just for breads.... I will have to look into that!

Our new bread discover is homemade pita bread.  I should clarify that I like to roll mine super thin so they are more like baked naan than pita but boy are they yummy!  The reason that pita bread has that delicious pocket is that the heat at which it is baked, and the heat of the stone it is baked on, is so high that it turns the moisture in the dough to steam and causes air pockets.  Thus a pita pocket!  Now if you roll your dough to less than a quarter inch - yes it is very easy to do that - you get more of a bubbly naan like bread instead of a puffed pocket.  Both are super yummy and SUPER easy to make!

I am also going to throw out there that these can be made in a fry pan ON the stove as well!

Pita Bread

  • 2 1/2 c Flour
  • 2 t Salt
  • 2 t Yeast
  • 1 c Warm Water
  • Oil for the bowl
  1. Mix together your salt and flour in a large bowl.
  2. Mix the yeast and water in a small bowl and let sit for about 5-10 minutes.
  3. Combine the yeast water and flour mixture and stir until a dough forms.  Add a little more flour is your dough is too sticky.
  4. Lightly flour a work surface (the less flour you use the better) and knead the dough for at least 5 minutes but no more than 10.  The dough will lose it's stickiness and knead up well - it isn't that hard to knead either.
  5. Oil the mix bowl and place the kneaded dough ball back in the oiled bowl and roll around to oil the dough.
  6. Cover the bowl with plastic wrap and place in a draft-free place to allow the dough to rise.
  7. Once the dough has doubled in size (1-2 hours) punch it down and divide into 10 pieces.
  8. Preheat your oven to 450 F and place your baking stone or baking sheet in the oven while it is preheating.
  9. Roll out three of the dough pieces into circles about 1/4 inch thick.  Keep the remaining dough pieces under the plastic wrap while you are rolling out your circles.
  10. Once the oven and stone are preheated place your three pita circles on the stone in the oven and bake for 3-5 minutes.  They won't stick to the stone.  If they are thick enough they will puff up like a pita, even if yours do not puff they are still DELICIOUS!!  You can top the flat pitas with sauce and cheese to make a very yummy pizza!
  11. While the first three are baking roll out another three pieces of dough into circles.  Once the first three are done baking, remove them from the stone and place them on cooling racks.  Immediately place the next three circles on the stone to bake for 3-5 minutes.  Continue this until all the dough is used.
  12. Store the un-eaten pitas - if there are any - in an air tight container at room temp.  I can't really tell you how long they will last seeing there have never been any left after the second day in my house.
  13. ENJOY
I cannot stress how WONDERFULLY DELICIOUS and east to make these pitas are.  I have found myself making batches just to make pita chips.  They really do make a wonderful personal pizza base and at 125 calories per pita you can afford to eat it as a pizza shell.  (That is 125 calories per pita if you divide your dough into 10 pieces.)

What are you favorite things to do with pita bread?  Mine is peanut butter but that isn't really a surprise - peanut butter goes with everything!

Sunday, December 30, 2012

English Muffin Bread

As I am sure you can tell, I LOVE bread!  All sorts of breads.  I have always had a special love of english muffin bread.  I am not a fan of english muffins - I don't know what it is but that little muffin does nothing for me.  Now a slice of english muffin bread, toasted, HEAVENLY!  I tried not to buy it too often for fear of eating the whole loaf in one sitting.

A few years ago I came across a recipe for english muffin bread.  Of course, being me, I had to try it out.  It was perfection in FOUR LOAVES.  Now years ago I would have just contentedly made my way through all four loaves, now-a-days I am pretty sure that would not only be EXTREMELY detrimental to my journey, but make my stomach go on strike as well.  It is for that reason that I haven't made the bread in a while.  I stumbled across the recipe again a few days ago and the craving hit.  I decided to make the four loaves and hopefully find homes for the three I shouldn't eat :-D.

English Muffin Bread

  • 1 1/2 c Boiling water
  • 3 1/2 c Cool Water
  • 6 3/4 t Rapid Rise Yeast*
  • 2 T Salt
  • 3 T Sugar
  • 11 c Flour - I use all purpose but I am pretty sure the original recipe called for Bread Flour.
  • Butter or Margarine
  1. Prepare your four loaf pans by liberally greasing them and set them aside.
  2. Coming the boiling water and the cool water in your bowl.
  3. Add the remaining ingredients and stir until the dough just comes together.  IT WILL BE STICKY.  
  4. Divide the dough between your 4 loaf pans and set aside in a warm draft free area until the dough has risen to the top of the loaf pans.  (This takes about an hour or two.  I always cover my rising dough with a towel, but it isn't needed if there is no draft.)
  5. Preheat the oven to 350 F.
  6. Once the dough has risen bake it for about 35 minutes.  It should start to brown.  
  7. Once the dough starts to get a golden brown color, baste the top with a little melted butter and cook until a nice golden brown color - about 10 minutes more.
  8. Remove from the oven and place the pans on their sides.  (This is so that the bottom of the bread won't stick to the bottom of the pain - I do this will all my loaf breads, it isn't necessary but it does make a difference.)
  9. Allow to cool completely before cutting - if you can do this you are stronger than I am!!
  10. ENJOY

Sorry I have no "in process" pictures - I made the bread in between shoveling the foot deep snow out of the driveway.

This bread makes the BEST toast!  I am personally a peanut butter fan, however jelly/jam or just butter taste wonderful as well.  I like my english muffin toast to be thinner sliced so I can normally get about 15 - 20 slices out of one loaf (20 of thinner sliced and only AFTER it has completely cooled).  That is 60 - 80 slices of bread - I would say that the 11 cups of flour is about 2-3 pounds worth and the yeast is the equivalent of three packages (if you don't buy in bulk).  Yeast has been on sale lately for about $1 - $1.50/3 pack and you can get a 5 pound bag of flour on sale for $2 - $2.50.  So let's say that you would spend $4 (maximum) on this recipe, in the grocery store that would get you 4 packs of english muffins (on sale for $1 each).  That is only 24 english muffins, this bread gives you SIXTY - EIGHTY slices.

The calorie  breakdown is like this:  if you slice thin like I do and get 20 slices per loaf then you are looking at about 58-60 calories per slice.  A thicker slice (15 per loaf) would probably bring you in around 78-80 per slice and you can always go even thicker for about 100-108 - but those are really thick.  All in all a winner in my book!!

*You can use regular yeast in this recipe, you just have to add a step.  If you choose to use regular yeast instead of rapid, you have to allow the dough to rise in the mix bowl until it reaches the top and then divide into the four loaf pans.  You will then have to allow the dough to rise again in the loaf pans.  Not a horrible thing, just more time consuming.

Saturday, December 29, 2012

Mozzarella


The little list in my head now has another check!  There were three things I wanted to make by the end of the year, I have succeeded in making two of them - graham crackers and now mozzarella cheese - the third will have to wait until I can really research the best cocoa beans.  
If you aren't a cooker then the process of making mozzarella might be daunting.  I am here to tell you it is SIMPLE.  It takes about thirty minutes (give or take a few) from start to water bath.  In the end you not only have something homemade, you also have a delicious ball of cheese!!  


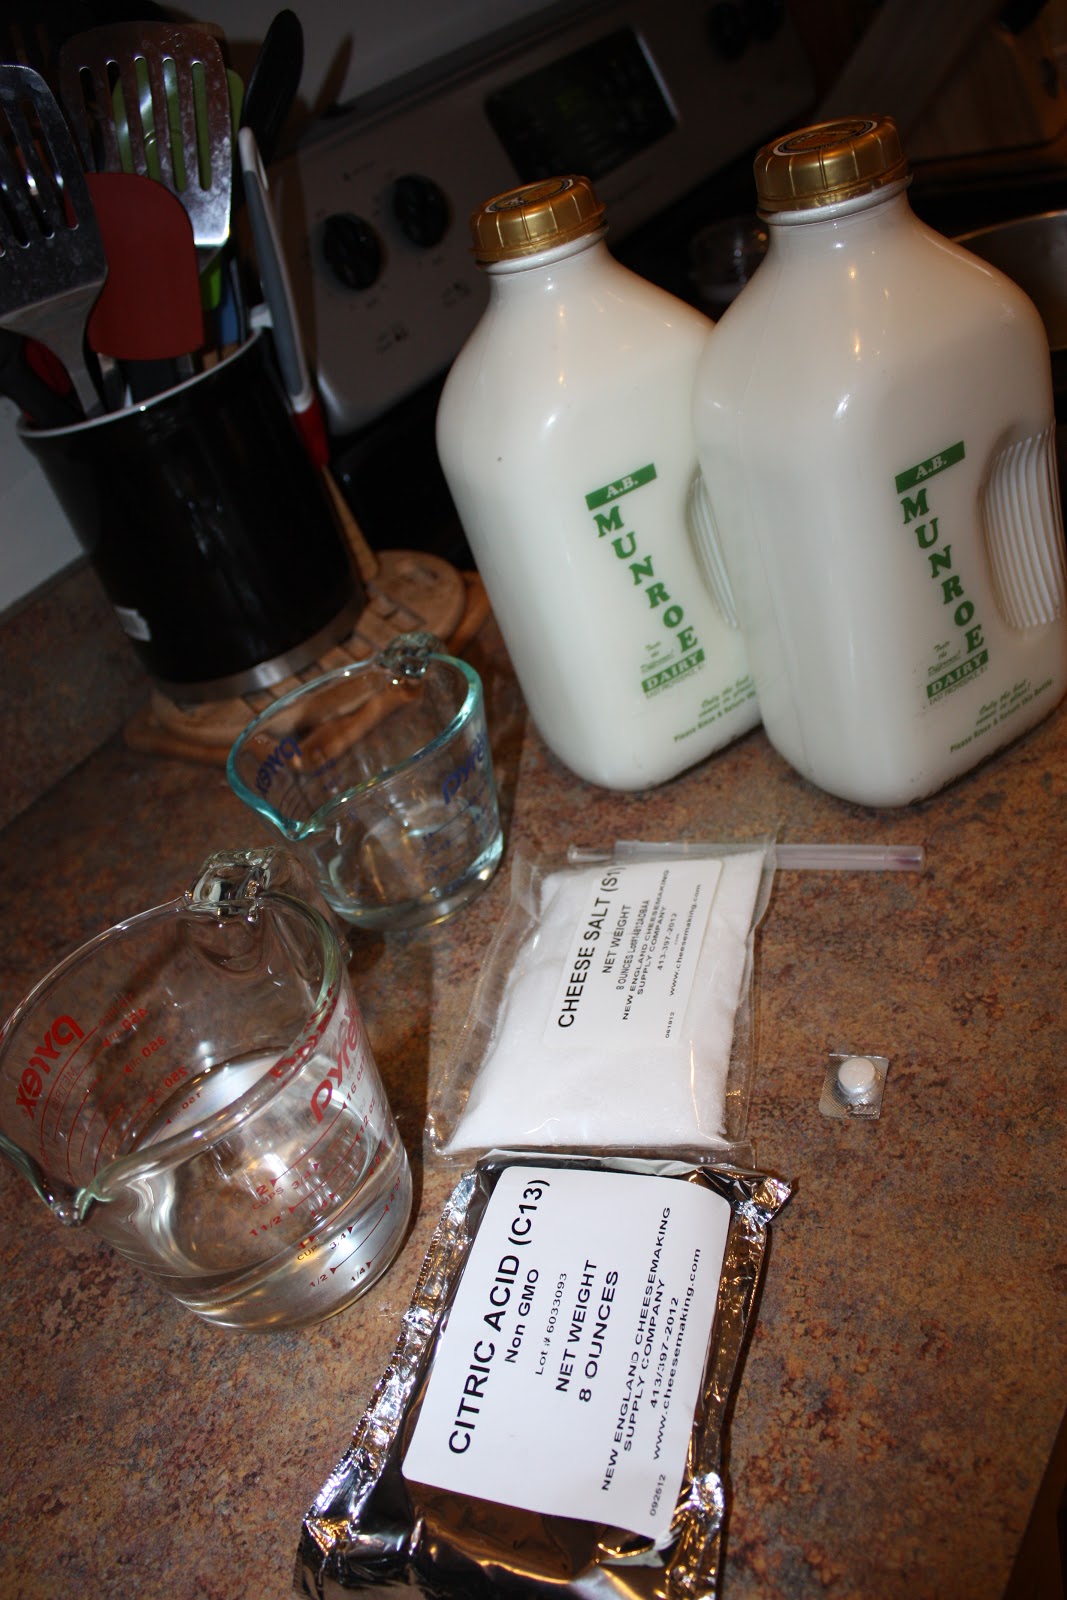
Tools/Ingredients
  • 1 Gallon of Milk - it can be the fat content of your choice.  Obviously whole milk would make a richer cheese however I used 1% and the cheese was still great!  The one thing you HAVE to be sure about is the pasteurization process of your milk choice.  In order to make quick and easy home made mozzarella you cannot (let me stress that again- CANNOT) use UHT (ultra-high temperature pasteurized or just ultra-pasteurized) milk.  That milk you grab from the big chain grocery stores (Garelick, Hood, etc) is UHT.  It gives the milk a great long shelf life, but it causes great loss of folate, B12, Vitamin C and Thiamin.  It also makes creating quick yummy mozzarella at home impossible - curds will not appear no matter how much rennet you use!  In our house we get our milk delivered from a local dairy.  Their milk is gourmet pasteurized so obtaining milk was not an issue for me.  I would suggest you try your local dairies if you want to attempt this recipe.  Call around and ask what their pasteurization process is, most dairies are more than willing to discuss this with you. 
  • 1 1/4 c Water - if you live in a city that has a highly chlorine level in your water use bottled.  Rennet and Citric Acid do not play well with chlorine.  
  • 1 1/2 t Citric Acid - You can find citric acid a bunch of places.  First make sure you are buying FOOD GRADE.  I have citric acid in the house for my soaps and lotions - that is not the stuff we want for our cheese making.  Local brewery supply stores normally carry cheese making supplies, that would be where I would go if you don't want to purchase your supplies online (which is my suggestion).  
  • 1/4 Rennet Tablet (or 1/4 t of Rennet Liquid) - now for the "gross" part.  For those of you that don't know,  traditionally, rennet is a group of enzymes found in the lining of a calf's stomach that helps with digestion. If this thought bothers you, I suggest you don't look at those wonderful cheeses you buy from fancy stores!  There are such things as "vegetable" and "microbial" rennet.  (I use the microbial rennet which is actually made from a coagulating mold - this is fun stuff people!)  If a person tries to sell you vegetable rennet that was commercially made call foul - there is no commercial source of vegetable rennet.  It is normally locally made by people that know how to get the coagulating features out of figs and the like.  Most vegetarian approved cheeses are made with microbial rennet.  You can purchase this online where you get your citric acid.  (I will give you a couple of links at the end of the post for all you people that don't like to peruse random sites.)
  • Cheese Salt - not necessary at all, but it is cheap and it is a finer grade than regular old kosher salt.  If you can't find any, but want something that will be that fine grade try some canning salt. 
  • A Pot/Pan - it must be big enough to hold your gallon of milk and still have enough room for some vigorous stirring.  It also CANNOT be a conductive metal!!  In other words, stainless steel, glass, or ceramic ONLY.  For those of you that are going to ask, Caphalon pans are coated and therefore should be able to be used.  That being said, the coating is only good if you have never used a metal utensil on it, scoured it, or it is less than about 15 years old.  The coatings can wear away or get scratches.
  • Dairy Thermometer- they are cheap and can be purchased with your rennet and citric acid.  Please do not try to use a meat thermometer for making cheese!
  • Colander/Cheese cloth/ Strainer - I, personally, use a cheese cloth however that does not mean you need to.  They can be expensive and add steps upon steps to clean up.  As long as you have a fine mesh on your strainer/colander you should be fine - and you will only need that if you too vigorously stir your rennet!
  • Slotted Spoon - I really have nothing for this one - it is a staple instrument in every house :-D
  • Knife - it needs to be long enough to cut through the curds to the bottom of the pan.  SO if you are using a stock pot, don't pull out a 3 inch paring knife to get the job done.
  • Microwave safe bowl - I am giving you the instructions for a quick and simple cheese making - and that requires heating in a microwave for stretching.  You can do this with a water bath but it takes longer.
  • Rubber Gloves - not necessary at all!!!  I use them cause I am a wimp and that thin layer of rubber helps disperse the heat from the cheese during stretching so I don't feel as if I am melting my hands!!
Process/Procedure
Curds and Whey (I over mixed my rennet so they are flakey)
Prior to microwaving
Water Bath
  1. Dissolve 1/4 of your rennet tab into 1/4 c of cool water.  Mix gently and set aside.
  2. Dissolve 1 1/2 t of citric acid into 1 cup of cool water.  Pour into your pot.
  3. Add your milk to the pot and turn the heat on med-medium high, stirring constantly and vigorously.
  4. Heat the milk to 90F
  5. Remove the pot from the heat and slowly stir in the rennet mixture.  Combine using up and down motions for about 30 seconds. (If you stir the rennet mixture for too long you will end up cutting your curds as they form.)
  6. Cover the pot and DO NOT TOUCH for at least 5 minutes.  (Rennet is a very gentle thing, it needs to be left immobile while it works or your cuds could be flakey.)
  7. After about 5 minutes check your curd.  It should look like a custard or cheesecake consistency with a clear separation between curd and whey.  (Whey should be a mellowly clear color, if it is milky recover and let it set for a few more minutes.  If you did not get any curds, check the pasteurization of your milk.)
  8. Cut the curd with your knife, be sure to reach all the way to the bottom of the pot.  Cut it in a criss cross pattern on a diagonal.
  9. Place the pot back on the burner and heat to 105 F.  Slowly stir the curds while you are heating.
  10. Once you reach 105 F remove from the heat and continue to slowly stir the curds for 2-5 minutes.  
  11. Strain off the whey - you can reserve it for recipes - and place the curds in your microwave safe bowl.
  12. Place the bowl in the microwave for 1 minutes.  Remove and gently fold the curds into one piece - drain off the whey as you do this.
  13. Add in the salt to you preference, I use about 1 t, while you are folding the curds.
  14. Return the curds and bold to the microwave and cook for another 30 seconds.
  15. Drain and stretch the cheese.  (Stretching the cheese is just that - pull on the cheese like you would taffy and fold it back in on itself.  Keep doing this until the cheese is smooth and shiny.  The cheese must be 135 F in order to stretch properly so if the last round in the microwave did not make it hot enough, pop it back in for another 30 seconds.)
  16. YOU HAVE CHEESE!!  You can now form it into a ball, braid it, or make string cheese out of it.  You could even roll it out and add some herbs or pesto.  Whatever you do with it, you will want to finalize your cheese with a water bath.  Submerge the cheese in a cold bowl of water for about 5 minutes followed by a bowl of ice water for 15 minutes.  This allows the cheese to hold it's shape and protects it from getting grainy.
  17. ENJOY
OK I know it seems like a lot - but remember I am wordy!  It was simple and fun and I can't wait to make my next batch.  It seems that, depending on the milk/process, you get about 12-16 oz of cheese for every gallon of milk.  So if I only paid $5 for my gallon of milk I am saving at least $3 off the local cheese we normally buy!!  I would love to give you a calorie count, however it is difficult to do.  I tried to calculate my cheese, made with 1% milk and it came in around 60-75 calories per ounce. 
 
Isn't that GORGEOUS?!
I am a firm believer that once you have fresh cheese you will NEVER buy that horrible pre-shredded stuff in the refrigerator section of the grocery store again.  If you try this, let me know if you believe that as well!

Links: 

New England Cheese Making Supply - They have EVERYTHING you could need/want.  They even sell kits!!


Sunday, November 25, 2012

Turkey Day Favorites

I have at least three recipes that I want to share with you from Thanksgiving, but seeing they are all related I decided to do a "Thanksgiving Episode"!  We were fortunate enough to host this year for the Hubby's side of the family - there is no way my side would all fit in the house let alone have a sit down meal!  I was super excited!! Not only did I get to cook the turkey and ham, but I got to create some delicious side dishes and stage what I hope was a wonderful meal.  It seemed to go wonderfully so I am hoping to make our hosting into an every other year tradition!

Now for the recipes.

This year I decided to brine the turkey.  Now I have brined meats in the past with good success, but I have never brines a turkey.  Especially not for a main course holiday!  Of course I contemplated spending the $15/can on some Williams Sonoma brine but I just couldn't bring myself to do it.  I decided I could make my own based on my tastes and hope everyone else would enjoy it.

Turkey Brine

  • 1/2 Gallon Water*
  • 2 1/2 Tubs Veggie Stock* (*or enough bouillon/broth to make 1/2 gallon) 
  • 1/2 c Salt
  • 1/2 c Sugar
  • 1 T Rosemary
  • 1 T Sage
  • 1 T Thyme
  • 1/2 t Garlic 
  • 1/2 Gallon Cold Water
  1. Combine all ingredients save the 1/2 gallon of cold water in a stock pot.  Bring to a rolling boil and cook until sugar and salt are dissolved.  
  2. Remove from heat and allow to cool slightly.
  3. While the brine is cooling prepare your turkey by removing the innards and giving it a good washing.  Pat the turkey dry and place it in a brining bag or large pail - I use a brining bag cause space is limited in my fridge.
  4. Combine the cooled mixture with the 1/2 gallon of cold water, mix together and pour over the turkey.  
  5. Seal up the bag or pail and place in the fridge for approximately 1 hour per pound of bird.  
  6. Once the brining is complete be sure to RINSE YOUR BIRD THOROUGHLY or you will have a very salty tasting dinner.  
  7. Stuff and/or cook your turkey as you normally would - keeping in mind that brined birds tend to cook a little faster than non-brined.
  8. ENJOY
See, easy!  If you have a super large bird that the brine does not cover completely then you will have to flip it half way through the brining process (or simply double the recipe and use enough brine to cover the bird).  It produced a wonderfully tender and juice turkey with just the right hint of seasonings.  I was very pleased!  Forget spending $15 for a one time use can of brine mix - this will now be my go to for brining large birds!


The next recipe I am going to share is my stuffing recipe.  Now I grew up in a Portuguese family, which means that stuffing contained chourico or linguica.  Now Portuguese sausage is wonderful, especially with peppers, onions and some cheese on a roll, but it can be an acquired taste and I was cooking for non-Portuguese people.  (I should point out that I am not a huge stuffing fan to begin with, if I want to eat bread I am going to eat bread.  It doesn't have to be mashed and flavored :-D)  To that end I wanted to create a stuffing that still had the same principle of the stuffing I grew up with, but without the extra kick linguica would give it.  I give you:

Chicken Sausage and Herb Stuffing

  • 14 oz Wheat Bread (about 3/4 of a large loaf)
  • 2 T Butter or Margarine
  • 1 1/2 c Onion, diced
  • 1 3/4 c Celery, diced
  • 4-5 links Chicken Sausage (I used Italian flavored)
  • 2 1/2 - 3 1/4 c Chicken Broth
  • Sage, to taste
  • Thyme, to taste
  • Garlic, to taste
  • Salt and Pepper, to taste 
  1. Toast and shred the bread into a large bowl.  I have found this is the easiest way to dry out the bread, but you can also cube it and bake in the oven or leave out on the counter over night - though this method has been met with varying success.  Set the bowl aside.
  2. Remove the casings from the sausage links and chop into small pieces to facilitate crumbling.
  3. In a large fry pan combine the celery, onion, butter and sausage.  Cook on medium high heat until sausage is warmed through and celery is translucent.
  4. Add the sausage mixture to the bread bowl and mix well.  
  5. Mix in the spices to taste and slowly add the broth until the desired consistency is achieved.
  6. Transfer the stuffing to a lightly greased casserole dish.  Now you can either bake this dish now, or refrigerate the stuffing until Just before your turkey is done cooking.
    1. To cook the stuffing immediately you should preheat your oven to 375 F.  Cook the stuffing to 30 minutes, removed from the oven and mix gently.  Return to the oven and cook for another 20-30 minutes until golden brown.
    2. To prep the stuffing for future cooking just place in the fridge.  Remove the stuffing about 10 minutes prior to cooking to allow it to acclimate.  Seeing the stuffing takes about 1 hour to cook I find it is best to throw it in the oven during the last 20 minutes of the turkey cooking.  That way the stuffing will cook while your turkey is "resting".
  7. ENJOY
Again, easy!  Now stuffing is mostly bread so if you are thinking that it is a lower calorie food I am sorry to burst that bubble.  That being said this stuffing actually comes in not as high and one would have expected.  I divided the recipe into 9 equal servings - which for this limited stuffing eater was a BIG portion - and came up with about 175-180 calories per stuffing.  Not bad for chickeny bready goodness!


The final recipe I will leave you with is one I am sure you have all made at some point in your lives - I just have a different twist.  PUMPKIN PIE!  Now I am NOT a pie fan.  I am pretty sure it stems from my hatred of pie crust.  I have always loved pumpkin pie but I would only eat the filling growing up and leave a big empty pie crust shell on my plate.  A few years ago I discovered how to remedy the empty shell issue - GRAHAM CRACKER CRUST!  I love graham cracker crusts.  They are the perfect answer to my pie crust dilemma.

Pumpkin Pie with Graham Cracker Crust

  • 2 c Pumpkin , mashed or purĂ©ed
  • 3/4 c Sugar
  • 1 t Cinnamon
  • 1/2 t Ginger
  • 1/4 t Cloves
  • 2 Eggs
  • 1 can Fat Free Evaporated Milk
  • 1 1/4 c Graham Cracker Crumbs
  • 1/3 c Butter or Margarine, melted
  • 4 T Sugar
  1. Preheat oven to 375F.
  2. Combine the graham cracker crumbs, melted butter and 4T of sugar in a bowl.  Press the mixture into the bottom and sides of a pie plate and bake for 5-10 minutes or until golden brown.  Set aside.
  3. Increase oven temperature to 425F for 10 - 15 minutes or while you prepare the pumpkin filling.
  4. Mix together all remaining ingredients save the evaporated milk.  Slowly pour the evaporated milk into the mixture and combine well.
  5. Pour the pumpkin mixture onto the prepared graham cracker crust.  Reduce oven temperature to 350F and bake the pie for 40-50 minutes or until a knife in the center comes out clean.
  6. Serve warm (or cool) with cool whip and ENJOY!
The best pumpkin pie ever all due to a graham cracker crust!  The calorie count of this pie reflects the lack of "classic" pie crust as well.  For 1/8th of the pie you are looking at 200 calories, where as with a regular pie crust you would be facing 285 calories per piece!

Honorable mention goes to my water pitcher.  I have never gone through so much water before.  Very simply I added some cranberries and sliced lemons to my water picture and filled it up - such a hit!


And there you have them folks.  My picks for Thanksgiving favorites.  I could have added in the zucchini bake, sweet potato casserole, molasses cookies, or even glazed ham; but this post is long enough as it is.  I leave you with this wonderful picture of us just starting to gather about the table for our feast! :-)


Monday, November 19, 2012

Peasant Bread


By now you should all know that I love bread.  Sweet breads, yeast breads, rolls, heck even pretzels.   I do own a bread machine, but I find that I now only break it out every few months.  I am much more opt to whip up a batch of loaf bread or apple bread.  However my current favorite, crusty bread, might now have some competition.  I love crusty bread for it's ease and super yummy crispy crust, yet the draw backs are that it takes a bunch of steps for baking AND to ensure it rises properly you need to let the dough sit for at least 4 hours.  Now the peasant bread calls for simple mixing, however there are "rising and punching" periods.  All in all I would say that this recipe, from start to eating, takes about 2.5 - 3 hours - very good when I realize I want bread with dinner and it is 3pm.

Peasant Bread

  • 4 c Flour*
  • 2 t Salt
  • 2 c Water, lukewarm **
  • 1 T Sugar
  • 2 t Dry Active Yeast
Proofed Yeast!
  1. Mix the flour and salt in a bowl and set aside. *I used all-purpose flour, however you can substitute 1/4 of the flour for whole wheat if you are so inclined.  Please keep in mind that the whole wheat flour will affect the consistency of the bread if you decide to use more.
  2. Dissolve the sugar in the water and sprinkle the yeast over the water mix.  Set aside for 10-15 minutes until the yeast is foamy.  **The best way to "proof" your yeast is to boil 1/2 c of water and add 1 1/2 c of cool water to the boiled water.  This way the water will be the perfect temperature - no fear of over heated water killing the yeast.  
  3. After the yeast foams, stir the water mixture gently and slowly mix into the flour.  Scrape the bowl sides down and mix thoroughly.  
  4. Cover the bowl with plastic wrap or a warm, damp towel*** and set aside in a warm draft-free place for 1-2 hours until the dough has doubled in size.  (***I find it is best to preheat the oven to 450 for 1-2 minutes, turn off the oven and place the dough in it's bowl with a warm damp towel in the oven for it to rise.  I do this because we always keep the fans going in our kitchen and therefore the oven is the only "draft-free" zone in the kitchen.)
  5. Butter two oven safe bowls and set aside while the dough rises.  When the dough has risen take two forks and "punch" it down, being sure to fold the dough in on itself as you scrape the sides.  
  6. Divide the dough in two and put the dough sections into the buttered bowls and set aside to allow the dough to rise for 30-60 minutes.
  7. Preheat the oven for 425 F.  When the dough has risen (almost double in size again) place the bowls directly into the oven.
  8. Bake for 10 minutes and then turn the oven down to 375 F and bake for an additional 20-30 minutes until the bread is golden brown.
  9. When you remove the bread from the oven be sure to dump it from the bowls immediately.  Allow the bread to cool for 10 minutes - if you can - before cutting.
  10. ENJOY
The bread comes out light and fluffy with a slightly crispy (not crunchy) crust.  I, of course, can never wait the requisite time for cooling before cutting into the loaf - something about freshly baked bread!  I am not going to "lose" my crusty bread recipe - these are two different types and I love them both.


The calorie count of this recipe actually surprised me.  It makes two good sized loaves.  Deciding to err on the side of caution, I divided the recipe into 20 slices (it definitely makes more slices than 20).  Keeping with the 20 slices, the bread comes in at 84 calories per slice.  Not that bad for a homemade bread!

If you are so inclined give it a try - be sure to let me know your thoughts!

Friday, November 16, 2012

"Refried" Beans

As I have said before, the hubby loves all Mexican foods!  Due to this fact I find myself making Mexican inspired dishes at least twice a week - good thing I have developed a taste for them as well.   Now most foods you can just whip up at home without much fuss.  I have posted before about making your own taco seasoning - which is a staple - but I was still spending money on cans and cans of refried beans for different recipes.  Not that a can of refried beans is super expensive, but I like making my meals from scratch and therefore knowing all the ingredients I am using.

With that in mind I decided to whip up a batch of refried beans to use for the taco pizza I was making for dinner.  I have to say I am very pleased with the results.  I halved a recipe - there was NO NEED for 4 pounds of refried beans - and I thoroughly enjoy the fact that I can make them "runny" like restaurants or thick like canned!  They tasted great and the halved recipe made at least 34 (1/4c) servings - plenty to freeze for later use.  Now the refried is in ""'s due to the fact that there is no actual frying in this recipe - it is done 100% in the crockpot.

"Refried" Beans

  • 2 pounds of dry Pinto Beans, rinsed
  • 1 Onion, chopped
  • 4 T Garlic, minced
  • 2 1/2 t Salt
  • 1 t Pepper
  • 2 t Cumin
  • 10 c Warm Water
  1. Combine all the ingredients in the crockpot.  Be sure to pick out any floating beans.  Mix well and cover.
  2. Cook on high for 2 hours followed with 4 hours cooking on low.
  3. At the end of the 6 hours, remove some of the liquid (I just put a pyrex measuring cup along the side and squished the beans down to collect the liquid.  I probably removed 3-4 cups, but I retained 1 cup in case I needed to add some back).  
  4. Mash the beans to the consistency of your choice - adding back some liquid if desired.  
  5. ENJOY
Could it be any simpler than that?!  The recipe makes 16-17 cups, depending on the liquid used.  It isn't calorically healthier than canned beans - let's face it beans aren't the lowest calorie food.  It is however homemade!!  The amount of liquid I left gave me 34 servings which equaled about 90 calories per serving - same as the leading canned refried beans.  I have now stocked my freezer and will be able to just grab a bag the next time I want to make tacos, dip, or anything calling for refried beans!

(I will post a picture of the beans the next time we eat them as a side - with all the toppings you can't really see them in the taco pizza picture.)

The point I would like to stress is the money saving with this recipe.  The onion, water, and seasonings are all things I keep in house and therefore weren't an expense.  The beans I got on sale for $1/lb.  Therefore for 34 servings of beans I paid $2.  Even if we add in the expense of the seasonings and onion - lets say another $1 for those quantities (I am rounding UP) - I would have still only paid $3 for 34 servings.  That is a total of $0.09/serving.  The leading canned refried bean goes for about $1.25 - but let's say I got it on sale for $1.  There are 4 servings per can, that is $0.25/serving (on sale).  OK so I know that a savings of $0.14/serving isn't that much but think about it in terms of totals.  For $3 I can make 34 servings of HOMEMADE refried beans or I can buy 12 servings of CANNED refried beans. What are your thoughts?

Monday, November 12, 2012

Zucchini Bites

Think pizza bites but greener :-D  These little tots are yummy - husband approved - and super easy to make.  I threw them together to have with our pizza tonight.  The best part is you can add or remove what you want from the recipe.  The only "grain" they contain is bread crumbs, so they aren't as "doughy" as the pizza bites.  Experiment and make them into what you want!

Zucchini Bites

  • 1 c Zucchini, shredded and drained
  • 1/4 c Cheese, shredded (I used a mix of Parmesan and Cheddar)
  • 1/4 c Bread Crumbs
  • 1/4 c Onion, diced
  • 1 egg
  • Seasonings of your choice - I used some Italian and Garlic (my go to spices)
  1. Preheat the oven to 400 F.  (I was cooking a pizza at 450 and threw these in with it - worked fine.)  Prepare a mini muffin tin by coating it with non-stick spray.
  2. Mix all the ingredients together and spoon into your mini muffin tin
  3. Cook until golden brown and the edges are crispy (about 10 - 15 minutes).  
  4. ENJOY
See, super easy!  My suggestions are simple 1. Be sure to squeeze the excess water from your zucchini!! You will have soggy bites if you don't.  2. If you like that crispy crust - once they reach a golden brown color pop the broiler on for a minute or two.  3.  Be sure to let them sit for a few minutes before you pop them in your mouth, burnt tongues are no fun :-D.

The recipe above makes 12 bites at 27 calories per bite - not bad for a nice snack.  They are super filling.  So I would say you could eat the whole batch for a mere 324 calories, but I don't think you would make it through the whole batch!

Try them out and let me know your variations!

Friday, November 2, 2012

Mini Banana Chip Muffins

Per the Stinks request I set out to make mini muffins today.  In true Stinkles fashion, however, when they were completely he had moved on and wanted nothing to do with them.  It is not a review of the muffins that made him turn his nose up, it is his three year old attention span!

After the calorie intensive PB&J muffins from the other day I decided to swing the other way and make a low calorie mini muffin.  I think these are a success!  Of course if you don't like banana's, this is NOT the recipe for you.  I, however, love banana bread and therefore really like this recipe!

Mini Banana Chip Muffins

  • 1 c Flour
  • 1 c Banana, mashed (about 3 medium bananas)
  • 1 T Baking Powder
  • 1/2 t Baking Soda
  • 1/4 c Sugar
  • 1/4 c Unsweetened Applesauce
  • 1 Egg
  • 1/2 t Vanilla 
  • Chocolate Chips (optional but add that extra something)
  1. Preheat the oven to 350 F and grease your mini muffin tins.  (These can be made into regular muffins as well, but Stinks hardly ever finishes a full size muffin so I stuck with mini muffins.)
  2. Mix together the sugar, mashed bananas, applesauce, vanilla and egg.
  3. Mix in the powder, soda, and flour.
  4. Finally mix in the chocolate morsels.  (You will notice in the picture that I used white chocolate pieces - again at the little one's request!)
  5. Scoop a tablespoon of batter into each mini muffin cup.  (Be sure to only fill them 3/4 of the way or they will spread too much.)
  6. Bake until the muffins are set and a tester inserted in the center comes out clean.  (Be sure to cook until the sides start to brown - I removed my mini muffins a little early.  They still taste good, but I think they would have been even better if the side browned up nicely.)
  7. Allow to cool for about 10 minutes before removing the muffins from the tin.  
  8. ENJOY!
As this is my first time making these muffins I wasn't sure how many the recipe made.  It turns out that I made 24 mini muffins (though I overflowed about 14 of them so I could have easily had 30 mini muffins) and 2 regular muffins.  Taking that into account, I would say the recipe makes about 35 mini muffins or 12-14 regular muffins.  If you are making mini muffins, the calorie count comes in at about 35 calories per muffin.  If you are making regular muffins the count comes in at about 90 calories per muffin.  In either case I am pleased!  (If you want to omit the chocolate morsels - I used about 1/4 of a cup - then the calories come in at 26/mini muffin and 70/regular muffin!)

UPDATE:
I am just writing to say that these muffins are now a staple in our house.  I no longer make them mini - Brian and I prefer the normal muffin size.  They don't puff up as much as "normal" muffins, but they aren't nearly as calorie intensive so I am ok with this!  I can normally make about 18 muffins (I sometimes use 4 bananas and have been known not to measure all that well) which brings the calorie count to about 80 calories per muffin.  (I also use egg beaters.)


Let me know if you try them - I always like feedback!

Monday, October 22, 2012

Peanut Butter Banana Bread


I don't know about you guys but I LOVE peanut butter and bananas.  The only thing peanut butter goes better with is cheese - yes I am that person and don't knock it till you have tried it!  When I stumbled upon this recipe I knew it needed to be made as soon as possible.  As usual, I tweaked the recipe a little for my own preferences and this is what turned out:


Peanut Butter Banana Bread

  • 3 RIPE Bananas, mashed
  • 1/2 c Peanut Butter (I use creamy but use what you have)
  • 2 T Olive Oil
  • 2 T Unsweetened Applesauce
  • 1 Egg
  • 1/2 c White Sugar
  • 1/4 c Brown Sugar
  • 1 1/2 c Flour
  • 1/2 t Baking Soda
  • 1 1/2 t Baking Powder
  • 1 c Peanut Butter Chips 
  1. Preheat oven to 350 F.  Prepare one or two loaf pans (depending on your preference for two small loaves or one giant loaf) by greasing them and set aside.
  2. Combine sugars, peanut butter, oil, applesauce, and egg.  
  3. Add in flour, soda, and powder.  Follow with the mashed bananas
  4. Finally stir in peanut butter chips. Keep in mind that the batter is supposed to be lumpy, don't over mix.  
  5. Scoop batter into pan(s) and cook for 30-40 minutes for 2 loaves or 50-60 minutes for one, until golden brown and a toothpick inserted in the center comes out clean.
  6. Allow the bread(s) to cool for 5 minutes in the pan before transferring to a cooling rack for complete cooling.
  7. ENJOY


This is one of those recipes that is dangerous.  It goes together extremely easily and tastes wonderful - which of course makes it something that can be made often.  The original recipe calls for mini reese's peanut butter cups in the cake, for some reason that didn't sit well with me.  I am a fan of chocolate and peanut butter, but I didn't like the thought of that in my bread.  If you are inclined to introduce chocolate, you can always substitute semi-sweet chips for the peanut butter chips.  You can also omit the peanut butter chips all together.  Make the recipe your own!

Nutritionally the bread comes in right where one would expect.  I made two short loaves (for some reason that makes me feel like I have more bread - I know, weird) that I cut into 22 pieces.  With that in mind, the calories came in at about 150 calories per slice.  Lower than that of the apple bread (and the slices are a bit larger), but obviously the taste is very different.  I would say all in all I am happy with this recipe.  I am not sure I will abandon my regular banana bread recipe all together, but I will most likely be inserting this one into the banana bread cycle!

Sunday, October 21, 2012

Baked Pizza Egg Rolls

I woke up this morning wanting to cook.  I love being in my kitchen, making a mess, creating something yummy.  Today I knew I wanted to cook but I couldn't figure out just what it was I wanted to create.  I spent a good deal of time this morning trying to define what I was after.  It never did come to me.  I knew I wanted to "cook" as opposed to "bake" so most of my stand-by's were out.  I contemplated whipping up pot pie soup, but Brian is more of a fan of "Tastes Like Lasagna" (which apparently I have never shared here so be prepared for that post in the very near future).  Then I thought  pizza casserole sounded good, but I wasn't in the mood for pasta (yes I took my temperature to make sure I wasn't running a super high fever causing delusion).

So no pasta, but the pizza idea seemed to stick.  These were supposed to be wonton bites; however I didn't have any wonton wrappers in my house and I was too lazy to cut the egg roll wrappers down to size.  Hey, don't judge my laziness, I at least made something!

Baked Pizza Egg Rolls

  • 12 Egg Roll Wrappers
  • 1/2 c Mozzarella Cheese*, shredded
  • 2 T Pizza Sauce (I used Contadina - yum - but any tomato sauce will do)
  • 4 T (heaping) Diced Tomatoes
  • 1 T Mushroom, diced
  • 1 T Minced Onion
  • 1 oz Pepperoni, chopped
  • Garlic, to taste
  • Italian Seasoning, to taste
  1. Preheat oven to 375 F.  Foil line a baking sheet and place a cooling rack on the sheet.  Spray the rack with non-stick spray.
  2. Mix all the ingredients, save the wrappers, together.
  3. Spoon about one heaping tablespoon onto each wrapper and roll.  (To get the wrappers to stick brush the edges with water or a beaten egg.)
  4. place the prepared egg rolls on the rack, be sure to leave space so they are not touching, and spray the tops of the egg rolls lightly with oil.  
  5. Bake  in the oven for about 15-20 minutes, or until golden brown.
  6. ENJOY
By placing the rolls on a rack in the pan it allows them to
crisp on both sides without having to worry about flipping.  

Now being me, I garnished the egg rolls with a little fresh grated parmesan cheese (cause who doesn't like parmesan cheese?).  They are actually pretty good.  I always have to stress this when making baked egg rolls - THEY ARE BAKED.  If you are going into this thinking you will get that oily crunch out of your egg roll wrappers then you will be disappointed.  There is a crunch, but it is a different kind of crunch.  That being said, you can definitely deep fry these if you so desire - I just try to avoid high temperature vats of oil!


The egg rolls come in at around 90 calories a piece.  Not that bad in my opinion.  The recipe makes 12, we had them for lunch with some cucumbers (obviously) and avocado (another obvious choice).  I also supplied extra dipping pizza sauce - you never know when the need to dip will strike.  I ended up eating three for lunch.  I probably could have gotten away with just two, but I ate a skimpy breakfast this morning.  So for 270 calories I had three good sized pizza egg rolls and I am feeling plenty full!

This is another one of those recipes, like the muffin bites that you can do pretty much anything with!  Keep them pizza-like yet add different ingredients (i.e. peppers, bacon, zucchini) or completely change them into buffalo chicken egg rolls.  Slap on your chef hat and decide what you feel like that day!

Give them a shot if you are so inclined - and don't forget to let me know your thoughts!

*I am a HUGE fan of FRESH mozzarella.  I know many of you will think I am jumping on some sort of bandwagon (cause I am sure there is a "fresh cheese" bandwagon out there somewhere).  Whatever you think, try it.  I promise you, once you use fresh mozzarella in your recipes you will never go back to those pre-shredded bags hanging in refrigerated section at the grocery store.  I feel so strongly about this that I am currently buying the materials to make my own mozzarella.  That being said - use whatever cheese you like, the egg rolls are for you to eat and therefore should be made with ingredients you prefer.

Wednesday, October 17, 2012

Quick, Easy and Yummy

For something a little different today I have decided to share my go-to, quick, easy and yummy vegetables.  Normally I am all about fresh vegetables, however there are times when I just want something easy as a side dish. Something quick, to grab for a lunch that isn't a yogurt and that will take me 4 minutes or less to create a hot delicious small meal.  Now for those of you that will condemn me for using frozen vegetables, I encourage you to come spend a day in my life.  I do try, on as many occasions as possible, to stick with fresh (and even local) produce and dairy, however at times it is just not feasible; or I would prefer to spend the time playing Angry Birds with Linc.  I would also like to point out that at least we are still eating vegetables and not Big Macs!!  In my opinion these are a win-win!

What are they you ask?  I just like to build the suspense :-) (over vegetables no less).  Green Giant boxes!  Specifically the Teriyaki Vegetables and the Antioxidant Blend.

The third box is Brian's Vegetable Medley - contains potatoes and comes
in around 150 calories for the box.  Also yummy!

I have a membership to both Sam's Club and BJ's, which is the best place to buy things such as frozen vegetables.  I have to admit that I have never purchased these particular blends from Sam's Club, I seem to get them exclusively at BJ's.  Now don't let the front of the box fool you - as it did me the first time around - they are 40-50 calories PER SERVING, not box.  That being said, in both cases the entire box - if you are eating one as a meal - is only 100 calories.  

Antioxidant Blend on the left and the Teriyaki Vegetables on the right.
(Who is proud of me that I got the left/right correct?! - first try and all!!)
The antioxidant blend is a nice mixture of broccoli, peppers and carrots in a garlic-herb infused olive oil seasoning.  It is not to heavy, as some olive oil infusions can be, and is the perfect accompaniment to virtually any meal - at least in my opinion.  It also tastes well with the addition of some chicken breast.  I mix 4 oz of precooked boneless skinless chicken breast into the vegetables when they come out of the microwave and I have a very filling 210 calorie lunch!  

The teriyaki vegetables is a blend of broccoli, carrots and cauliflower in a teriyaki sauce.  Again the sauce is not to heavy, though I do find that at times there is too much sauce.  I have found that this box goes wonderfully with rice (where that extra sauce might just come in handy).  One cup of brown rice, drop the veggies on it and poof - instant 250 calorie DELICIOUS meal.  

I use frozen broccoli florets in a lot of recipes, but these boxes come out of the microwave ready to eat and perfectly seasoned.  At about $0.92 per box I can't go wrong!  (We buy them at BJ's.  There are 6 boxes per pack and they are $5.49/pack.)  

Now I have certainly tried to "make my own" frozen veggie packs.  I either do not have the flash freeze down, or they come out WAY to sauce heavy.  Until I perfect my own vegetable packs, I will be purchasing these for a quick, easy and yummy side or lunch!  

What do you guys think?  Anyone else have a favorite "quick, easy and yummy"?

Tuesday, October 16, 2012

Pizza Muffin Bites

Tonight was a scramble for dinner.  I didn't have a plan - not that I normally plan out all my meals, but I do normally at least have the start of an idea throughout the day.  Today I had NOTHING.  Brian is not normally a help in this area, his standard response is "it doesn't matter".  So while thinking about dinner during a lull this afternoon I volleyed out the thought of pizza to Brian.  It was returned positively and I was set - I would make a Top This! when I got home and we would have a wonderfully yummy pizza for dinner.  Fast forward to me arriving home and going to prep the Top This! - AHHH there is no pizza crust!
The scramble ensues.  I was thinking I could make a pizza casserole - we had that a couple weeks ago and I wasn't in the mood for a casserole.  I could try that "greek yogurt and self rising flour" crust - would that even work if the only greek yogurt I have is vanilla flavored?  I could scrape the pizza idea all together and start in a new direction - but now I really had my heart set on a pizza-like dinner!!  Time to search my "to do" recipe pile for something pizza-like.  Enter the pizza muffin bites.  Originally I passed these by thinking they were going to be very high calorie for a few little muffin bites.  Yet after contemplating crescent roll pepperoni wraps and pushing dinner way back to allow for dough rising, I decided to revisit the muffin bites in the hopes of having dinner ready in the 30 minutes I had before Brian got home.  
They did not disappoint!  Not only does the the recipe come together quickly and easily, but they are fairly low calorie for what they are.  They are also quite yummy and versatile!

Pizza Muffin Bites

  • 3/4 c Flour
  • 3/4 t Baking Powder
  • 1 T Italian Seasoning
  • 3/4 c Milk (I used whole - thought I don't see why it wouldn't work with low fat)
  • 1 Egg
  • 1 c Mozzarella Cheese, shredded
  • 1/2 c Parmesan Cheese, shredded (If you use the canned grated I would cut back to 1/4 c)
  • 1 c Pepperoni, chopped
  1. Preheat oven to 375 F.
  2. Prepare mini-muffin tins by spraying with non-stick spray, set aside.
  3. Combine all the ingredients in a bowl and mix well.  
  4. Set the bowl aside and let sit for 10 minutes.
  5. Stir the batter and spoon into mini-muffin tins.
  6. Bake for 25-30 minutes (I baked for about 25 minutes and they were still soft in the middle, I prefer crunchier so I will probably cook them longer in the future.)
  7. ENJOY!!
See?  Super easy and very yummy!  Start to finish they took about 40 minutes and satisfied my pizza craving.  Now the fun part - they are 37 calories a piece!  I originally divided the recipe in two, giving each person a serving size of 12 mini muffins.  That turned out being too much, in my opinion, and too little in Brian's.  I ended up eating about 9 of them and feeling very full - I probably should have stopped at 7.  


Another great thing about this recipe is that you can mix it up.  Want to make it vegetarian - remove the pepperoni and add some veggies (not so sure if you can/would want to take the cheese out).  Not feeling pepperoni - add some real bacon bits instead.  Mix up the cheeses.  Make TACO muffin bites.  Oh the possibilities!!  Not only does it have a multitude of possibilities, but they bake up so quickly and are so easily transportable that I am envisioning a new party food!
Anyone have any other ideas? 

Adapted from Rachael Ray - Pizza Puffs